Silver Soldering Check List
Soldering is a process in which two or more metal items are joined together by melting a filler metal into the joint, the filler metal having a relatively low melting point.
This document is a check-list for the Silver Soldering process.
- Are the tolerances of the components to be joined accurate? Solder does NOT fill wide gaps
- Have you just this minute cleaned both parts to be joined or have they been left lying around? A clean joint is one that has just been cleaned. Use emery paper, scotch brite or wire wool to clean the joint.
- Are the components to be joined free from grease, oil, tarnish, rust or dirty finger marks? Degrease any oily work with Meths if necessary.
- Are you sure the metal to be joined is clean?
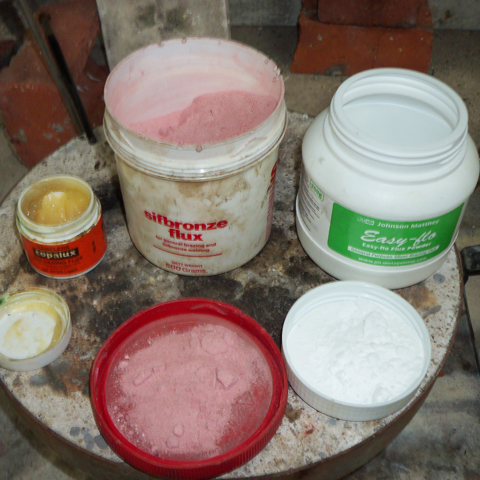
- Is the flux you are about to use the correct flux for the solder?
Flux protects the metals to be soldered from oxidising during the heating process and helps the solder flow. There are many differences between the fluxes but primarily they need to be able to withstand the increased temperatures to melt the different solders.
This document refers to Silver Soldering so use Easy-flo flux or a similar suitable brand.
- Is it old flux that you have brought back to life with water or have you mixed new flux in a clean, grease free, oil free, contaminate free container?Old flux is ineffective, contamination ruins the flux.
- Is the flux a nice thick paste and not a runny weak liquid? Too much water and the flux will be ineffective
- Have you made sure that the job is not going to roll or fall all over the place whilst you try to solder it? You may need to wire the job together.
- Is air going to expand in the joint and push the components apart they are heated? If so you could file a small groove for air to escape
- Are you sure you are not attempting to solder too many components at once? You risk melting a previous successful joint, overheating everything or oxidising a joint that you may want to solder next.
- Have you applied flux to both surfaces to be joined? Good now apply some more flux
- Is the extractor fan running, are you wearing the correct Person Protective Equipment?
The Soldering Process
- Set the job up and place some thermal bricks around it to contain the heat.
- Light the gas torch and begin to heat the job.
- Apply some more flux during the initial heating process. Use the stick of solder as an applicator.
- Concentrate the flame on the larger of the components so that the heat is raised evenly.
- Make sure that you can control the heat and have not got too big a flame.
- Notice that the flux will become “molten” you are now approaching the temperature at which the solder will run.
- Apply some more flux to the joint using the Silver Solder as an applicator.
- Look for the metal to start getting red and bring the temperature up with the flame evenly so that it starts to become red/orange.
- Move the flame slightly to one side and touch the solder onto the joint. Let the solder rest on the joint for a second or two.
- If the solder doesn’t run, move it away and re-apply the flame.
- After a short while bring the solder back onto the joint moving the flame slightly to one side.
- If the solder doesn’t run, move it away and re-apply the flame.
- After a short while bring the solder back onto the joint moving the flame slightly to one side, by now it should start to run.
- Once the solder has melted, gently play the flame back over and around the joint to ensure that the solder has flowed where it is needed.
- Take the flame away, turn down the gas torch and let the joint cool. Do not quench it or it may break apart.
Final Notes
The reason for this careful approach is to ensure that you do not over heat the joint and cook off all of the flux!
You must solder the joint in one continuous process. If you let the joint cool before it has been soldered you will have to clean all the components and start from scratch.
Post by Steve wood, Wimbledon College of Art - See more post by Steve Wood on process.arts

Silver Soldering Check List by Steve Wood is licensed under a Creative Commons Attribution-NonCommercial 3.0 Unported License.
Based on a work at theatremetalwork.myblog.arts.ac.uk.
")
To the extent possible under law, all copyright and related or neighboring rights to this Work, Silver Soldering Check List, by swood are Reserved.